

Radio Communication Microphones – The Untold Story
Fortunately, most commercial manufacturers of radio transceivers include a suitable microphone as a standard accessory. Typically, these are handheld microphones with a PTT switch. While transmitting, a radio operator would hold the microphone close to his mouth and press the PTT to talk. This arrangement works pretty well. However, quite often, the enterprising radio amateur might want to try out optional accessories like a desktop microphone, or go a step further and buy a fancy studio-quality microphone in a quest to sound like what some might term as BBC quality station… This is precisely when the mess usually begins to happen… Remember, even the rig manufacturers do not sell a desktop microphone as a standard bundled accessory. They know too well, that several operators would be clueless on how to set it up properly and therefore might end up creating a mess.
Broadcast Stations use Studio Mics and sound awesome, Why shouldn’t I use them?
The short answer is that they have acoustically optimized recording studios and hence they can use studio mics to their advantage. On the other hand, a typical average amateur radio shack is not. Moreover, the broadcast stations, especially the modern-day digital or FM stereophonic radio have high AF fidelity characteristics covering audio from about 200-18000 Hz. Their transmissions also feature a much wider dynamic range in comparison to typical communication radio transmissions. Hence, the microphone characteristics needed for broadcast studio applications are quite different from those for radio communication use.
The bottom line is, as amateur radio operators, the primary set of characteristics that we seek in a microphone are distinctively different from what is needed in a studio environment. Despite all this, if someone is adamant about using an expensive studio-quality microphone for amateur radio, then perhaps one could do it. All said and done, it will be a total waste of money and would provide no tangible advantage over a regular, lower-cost radio communication quality mic.

The type of studio quality microphones displayed above are never really needed for radio communication use. These microphones are an overkill for radio communication applications. Read through the article to find out why the studio quality microphones need not be used.
We will elaborate on various aspects that we have touched upon so far and much more as we move on. First, let us list out some the logical factors that determine the choice of a good cost-effective microphone for amateur radio applications…
- Broadcast Studio mic must have high fidelity, while Radio Communication mic needs to respond to only a narrow speech baseband spectrum.
- Broadcast studio mic must be able to capture loud sounds as well as soft whisper, while the Communication mic only needs to capture the voice of the radio operator.
- Broadcast Studio mic must be very sensitive to be able to pick sound from various sound sources placed across the studio, whereas the communication radio mic only needs to pick audio from a single radio operator.
- Broadcast Studio mic is unsuitable for being placed very close to the speaker’s mouth due to high sensitivity, while a communication mic typically needs to be placed in close proximity to the speaker.
Let us examine the practical ramifications of the above factors and their influence in the selection of suitable microphones for radio communication transceivers. We will also examine the potential pitfalls of using a desktop mic or a studio-quality mic in a typical ham radio environment and how they could potentially result in producing undesirable reverberations (echos) that could often compromise the intelligibility of the speech at the receiving end.
Radio communication Microphone – The Required Characteristics
By now, some readers might be wondering why am I so insistent against the use of more expensive microphones with better characteristics and specifications? NO, I am not… I am only against going out of the way to waste money on a microphone with any enhanced characteristics that eventually would have no bearing on the performance of the radio station.
Similarly, I am also against spending money on desktop microphones because they do not in any way enhance communication performance, yet they typically come with a baggage of acoustical issues that manifest themselves in an average ham-shack. I will elaborate on these acoustical issues in the next section of the article. For now, let us examine our basic microphone requirements.
Unlike broadcast radio systems, communication radio systems have an entirely different objective. Broadcast radio is designed to broadly provide entertainment to the masses and therefore the emphasis lies in providing the best possible quality of audio within the limitations of the system. On the other hand, communication radio is designed to cut corners on audio quality as long as the intelligibility of speech is maintained. The objective is to minimize the utilization of spectral, power, and other resources while fulfilling the above objective.
In view of the above, various microphone characteristics like its frequency-response, dynamic-range, sensitivity, etc are the core factors to be considered.
Microphone Frequency Response
A communication radio system has to transmit only human speech, while a broadcast radio needs to also transmit music, sounds of musical instruments, etc. Hence, the baseband bandwidth of a broadcast radio system has to be much wider, which at times, maybe High-fidelity (Hi-Fi) and cover a frequency range from as low as 50-100 Hz to as high as 18000 Hz. Therefore a broadcast studio microphone needs to have a frequency response that is as good if not better.On the other hand, a communication radio baseband is typically from 250-3000 Hz at the most, or even less at times. Our communication radio microphone has to perform faithfully within this narrow segment of the audio spectrum. All audio frequencies above or below this segment are of no consequence to a radio communication system. Those frequencies even if they are picked up, which actually are by most practical microphones, are destined to eventually be rejected and removed by electronic filters in the audio processing stage within the transmitter.
Every microphone in the market, however inexpensive it might be, will definitely fulfill this elementary 250-3000 Hz frequency requirement without any difficulty whatsoever. One needn’t normally worry about the frequency response parameter while choosing the microphone.
Microphone Dynamic Range
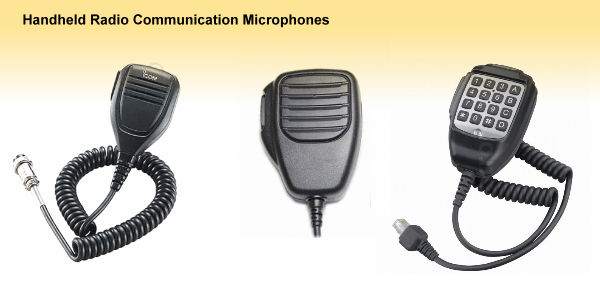
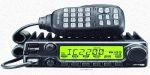
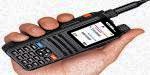
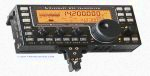
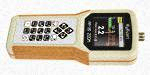
Several types of Hand-Held microphones are displayed above. They usually form a part of the standard accessories supplied along with radio communication transceivers. These microphones with an integral PTT switch need to be held close to the mouth of the speaker and hence they perform well under a variety of noisy and hostile environments.
In the case of a studio-quality Hi-Fi broadcast or recording environment, the dynamic range is an important factor. The microphone should be able to catch equally well the loud sound of a pipe organ, as well as, the gentle plucking of a guitar string, or a loud shout as well as a gentle whisper. However, this is not applicable to radio communication where the objective is to carry through the normal speech of a single human operator.
Therefore, the microphone dynamic range requirement for radio communication is only limited to the dynamic range excursion of the vocal chord air-pressure generated by the speech of the radio operator. This is a very limited range. In fact, a good radio operator often trains his voice to maintain a high overall average vocal acoustic power during the course of his speech. This ensures a better average depth of modulation during radio communication. At times, they also use electrical speech compressor circuits in the transmitter chain to deliberately restrict the audio dynamic range, thus providing a little more punch in the speech.
In other words, in the case of radio communication, when we often go out of our way in compressing and thereby restricting the dynamic range of speech, why on earth would a sane person want to unnecessarily pay through the nose by opting for a microphone that is painstakingly designed to do just the opposite. Moreover, we do not need a very high dynamic range microphone in a radio communication environment because the radio communication channel is inherently limited by the noise floor (QRN, QRM) on the lower side, while the modulator’s ALC control range limits it on the upper side. The overall net result is a fairly narrow dynamic range of audio level excursion in the case of radio communication, as opposed to a very wide range needed for studio broadcast and recordings.
Microphone Sensitivity
The sensitivity of a microphone determines its ability to pick up weak sounds. To an extent, the sensitivity is partially linked to the dynamic range parameter. Higher the dynamic range, then usually the better would be the sensitivity. The sensitivity attribute is electro-mechanically associated with the design and quality of the microphone’s diaphragm, its low-noise capability that might be largely determined by its design. The microphone mounting arrangement and its cartridge housing go a long way in determining its noise-floor and consequently its sensitivity. But that’s a story for another day…What matters at present, for us, is the fact that the distortion-free high-sensitivity performance of a studio-quality microphone does not happen by accident. Careful engineering design goes into creating highly sensitive mics. Therefore, these microphones are expensive. In the case of professional audio recording and broadcasting, high sensitivity mics are justified because sounds from multiple sources may need to be picked by the mic. The intensity of each sound source may vary drastically too. A sound may be of a waterdrop hitting the floor, while another might be a very loud one. All these sounds need to be captured in a studio environment.
Now, the most important question is, do we need this kind of sensitivity in a microphone for radio communication? The answer is an unequivocal NO!… A radio station operator would be the only person speaking into the microphone. He would be expected to speak normally, at a consistent volume. Therefore, any microphone with an average sensitivity will be more than adequate in a radio communication scenario.
Microphone Proximity to enhance Speech-to-Ambient-Noise Ratio
Unlike a quiet and a sound-proof studio for radio broadcast and recording that has been specially designed while keeping the important tenets of acoustic engineering in mind, a radio communication environment is usually an average room in a building, or at times, it could even be a fairly noisy location. Therefore, minimizing the influence of ambient audio noise is definitely a priority for radio operators.
Needless to say, a typical amateur radio station should be set up at a place that is least noisy. However, there are several other factors that may influence the perceived background noise as heard over the radio. This is based on a notion that is similar to the familiar notion of RF Signal-to-Noise Ratio (SNR). The only difference is that in this case, it is not the RF signal but the sound-wave that we are concerned about. We term it as Speech-to-Ambient-Noise Ratio. We need to optimize it. Let us see how it can be done.
The first point to remember is that just like radio waves, the intensity of sound waves in the air also attenuates with the increase in distance from the source. In fact, the sound pressure at a distance from the source is inversely proportionate to the square of the distance (1/D2) between the source and the observer. This is a fundamental principle that needs to be kept in mind because we will now build up a simple concept of perceivable ambient noise reduction by improving SNR, based on this inverse square law principle. Read on…
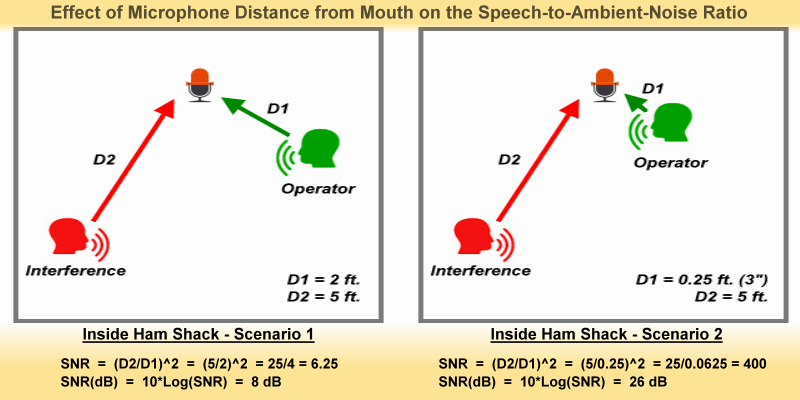
A self-explanatory illustration to depict different scenarios of microphone placement and how they influence the effective suppression of ambient noise in the radio ham shack environment.
Since a picture is often worth a thousand words, it might help to check out the illustration above to understand the concept. The idea is to leverage the microphone proximity to the speaker to enhance Speech-to-ambient-Noise ratio or the effective acoustic SNR. The illustration depicts two distinct scenarios. On the left-hand side is scenario #1 where the microphone is placed 2 feet away from the speaker's mouth, like in the case of a typical desktop microphone. In the righthand side scenario #2, the microphone is only about 3 inches away from the speaker's mouth. In both cases, there is another (unwanted) person, within the room but 5 feet away from the microphone location.
This speech from this person marked with a red icon is interfering with the speech of the radio operator (desired speaker) shown with a green icon. Therefore, in our assessment scenarios, the speech of the radio operator (green icon) is the Signal, whereas, the speech of the other person (red icon) is Noise. Now, let us see if the variation in the location of the microphone w.r.t. radio operator could in any way alter the signal-to-noise ratio (SNR) of the aggregate sound picked up by the microphone.
Does the distance between the microphone and the radio operator's mouth make a difference? Yes... Apparently it does. The illustration above is self-explanatory with highly simplified solved equations. We notice that the improvement in audio SNR is quite significant when the microphone is moved closer to the mouth.
In our example scenario #1, where the microphone to radio operator distance is 2 ft., the relative strength of the interference from the person 5 ft. away was only 8 dB below the speech of the operator. Therefore, the suppression of interference (noise) was only 8 dB. On the other hand, in example scenario #2 where the mic is about 3" from the operator's mouth, the difference in relative strength between the speech of the operator and the noise source turns out to be as much as 26 dB.
Therefore the conclusion is that in a radio communication environment, it is always beneficial to place the microphone closer to the mouth of the radio operator. However, a close mic placement throws up new challenges that need to be addressed. Luckily, these challenges are relatively trivial and can be circumvented by due diligence. We will address these factors further down this article... The bottom line is, a microphone placed close to the mouth of an operator in a radio communication environment is usually far better than the one placed at a greater distance.
Microphone Proximity to minimize Reverberations and Echos
Echos and reverberations are sound effects that are produced by the time delay between the arrival of the sound directly from the source and other components of the sound that might reflect from other artifacts, thus covering longer distances before arriving at the destination. Therefore, the same segment of sounds like a sentence, word, or syllable might reach the listener, repeatedly, several times, one after another, in a sequence. This effect is either echo or reverberation. The fundamental difference is that the time-delay between echos is long enough to clearly repeat a word or even short sentences without excessive overlap, whereas, the time-delay in the case of reverbration is rather short enough for the syllables to usually overlap.
In the case of theatre stage effects, or in cinema, or music, at times various degrees of reverberation and even echo effects might be deliberately introduced to provide special effects, or warmth in the sound. Echos and reverberations may be used constructively in a controlled studio recording environment. However, in a radio communication environment, echos and reverberations have no place whatsoever. Radio communication is not about providing entertainment and special effects but its core objective is to, as efficiently as possible, with the utilization of minimum resources, get the message across from one point to another with the least possible error or ambiguity.
Echos usually do not occur randomly in normal sized rooms and other typical radio communication environments, however, on the other hand, reverberations may often be a problem. In a typically restricted bandwidth (low fidelity) and noisy radio environment, our endeavor is to preserve the intelligibility of the message with minimum compromise. That is why we try to avoid all possible extraneous effects that could modify or distort the audio message integrity. Reverberation is one of these detrimental effects that we must minimize at all cost.
In a radio quality voice message, if reverberations were to be superimposed, they would tend to partially overlap every speech syllable with varying degrees of amplitude and time-offset. This would result in compromising the crispiness of spoken words and syllables. Various individual syllables will begin to overlap and merge with one another, thus rapidly making the speech unintelligible.
Reverbrations would always occur in any enclosed environment like a room or a hall. The extent of reverberation in terms of its magnitude, delay-time, number of simultaneous reverberating bounce paths, their decay-time, etc will depend on the properties and dimensions of the enclosure (room). The other important aspect that would determine reverberation characteristics would be the material used for its construction and furnishings which includes the floor carpeting, tiles, and linings on the walls and ceiling, furniture, draperies, upholstery, etc.
An acoustically engineered studio is carefully crafted to the desired sound handling characteristics. Judiciously selected sound-absorbing material is used for tailoring the interiors of the studio. Various types of material including tiles, paints, wood, cloth, etc are selected and used at proper places. The size and shape of the studio also play a vital role. When every detail is carefully calculated and measured, we get an acoustically tailored studio as per our requirements. In such a studio, which produces a controlled reflection and reverberation environment, we can safely place the microphones at relatively large distances away from the speakers and yet get excellent audio from the microphone. However, in a normal room, especially with not enough furnishing materials, if we were to place the microphone not close enough to the speaker, we might end up with the unacceptable amount of reverberations that could considerably reduce the intelligibility of the message in a radio communication environment.
In the 19th century, a physicist named Wallace Clement Sabine investigated the characteristics of reverberations and formulated several measurement methods. It is a standard practice to specify reverberation in terms of its decay-time. The time taken for sound reflections to decay down to -60 dB magnitude is called the reverberation time. The shorter this decay time, the lesser will be the reverberation effect.

Typical illustrations depicting alternate scenarios where the placement of the proximity of microphone placement to the operator's mouth significantly influence reverberations produced in a typical ham radio shack that is rarely optimized for studio quality acoustics.
However, for the sake of simplicity, with the intent to understand the concept that determines the relationship between microphone location and reverberation intensity, let us take a look at the two example scenarios that I present in the above illustration. Instead of calculating the -60 dB reverberation decay-time, we will examine the relative attenuation ratio of a single and identically reflected signal w.r.t a direct signal reaching the microphone. A higher relative attenuation ratio would eventually culminate in a relatively weaker reflected component in comparison to the direct sound. This will result in far feeble and less noticeable reverberation. We will term this ratio as Reflected Sound Ratio (RSR).
Another factor that we have taken into account is the Absorption Coefficient (Ac) of the reflecting surface. It's a wall in our case. We assume it to be a typical wall of a room in a normal hose. The wall reflects sound fairly well and hence Ac is chosen to be 0.2. However, on the acoustic characteristics of the room and various furnishings and sound-absorbing materials, Ac could well be far larger in the order of 0.5-0.7 or more. Some of the high quality sound-absorbing material used in the construction of studios often have Ac > 0.9.
Let us return our focus to the illustration above. The radio operator is shown with a green icon. The direct sound path to the microphone is shown in green while the reflected path off a wall is shown in red. Although there would be multiple (almost innumerable) reflection paths from every wall, floor, ceiling, and various furniture in the room, we will only analyze a single arbitrarily chosen reflection path. Our objective is to understand the principles governing the relative strength of reverberations.
In the lefthand side example scenario #1, a desktop microphone is placed 2 ft. away from the mouth of the operator. A wall at the far end with an Absorption Coefficient = 0.2 reflects a part of the sound which also reaches the microphone but with an additional time-delay that could potentially produce reverberation. On the righthand side of the illustration, the example scenario #2 presents a similar situation, however, there is one small difference. In scenario #2, the operator is closer to the microphone, with his mouth at a distance of only 2" away from it... The calculations shown in the illustration are self-explanatory. Therefore, I will not dwell into them.
We conclude from the examples above that in scenario #1 where the microphone is not too close to the speaker, the calculated value of RSR is only -18.5 dB. Hence, this scenario is bound to produce fairly noticeable reverberations which might compromise the intelligibility of the radio message under several types of propagation conditions. On the other hand, in the case of scenario #2, the calculated RSR is pretty good. It is -38.5 dB. If in a single reflection over a 15 ft. path, the relative attenuation of the reflected reverberation generating component is already more than 38 dB down, it is quite safe to conclude that there would be no perceptible reverberation in the case of scenario #2.
A microphone that is held reasonably close to the radio operator's mouth will always be immune to the undesirable effects of echos and reverberations. On the other hand, a desktop microphone might or might not be good enough. In its case, the reverberation characteristics will largely be determined by the room acoustics and other extraneous variables.
Radio Communication Microphone - The Optimum Choice
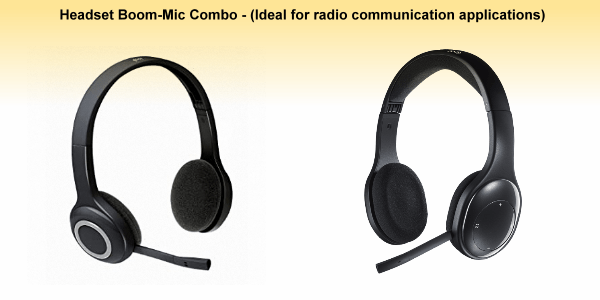
A Headset Boom-Mic combo is one of the most convenient as well as the best performing arrangement for radio communication applications. Although most commercially available headsets of this type may not natively support the interface jacks and connectors found on radio transceivers, a little effort to fabricate an interface patching hardware will be well worth it in the long run.
Historically, the earliest microphones were the carbon granule type. This was used for a long time in early telephone instruments. Thereafter, various other microphones became popular, among which the Dynamic microphone became a well-known type. This was far more efficient, sensitive, and also had a wider frequency response characteristics than the earlier microphone types. Eventually, the Electret Microphone was developed. This works on the principle of variation of capacitance between two layers separated by a stable dielectric material. This acts as a capacitor and hence is also called a condenser microphone. Electret microphone technology has developed rapidly over the last few decades. It is now perhaps the least expensive, yet a very stable microphone with excellent performance characteristics that is unmatched by any other microphone.
From the application perspective, microphones come in a variety of shapes, sizes, and price ranges. The core microphone cartridge that is used in most modern microphones, whether they are desktop types meant for high-quality studio recordings or for creating Hi-Fi podcasts. On the other hand, even the miniature microphones that go into small devices like mobile phones, etc are also typically electret microphones.
Therefore, it is not the core microphone cartridge that goes into each of them that is much different. Actually, it is the rest of the acoustical and mechanical design and fabrication details including their housing, shock or vibration resistant mounting, the sound deflecting baffles, directional response patterns, noise-canceling acoustical architecture, etc, etc, etc that set them apart, both in terms of cost as well as their application-specific performance.
When is a Desktop or a Boom-arm Studio Microphone needed?
In an auditorium, on a theatre stage, or in a broadcast or recording studio, most often it is not just one sound source that might need to be captured. There may be multiple participants in group discussion, or several performing in a play, or maybe a singer along with a couple of musicians might be performing. Whatever might be the case, the microphone must have a wide dynamic response. It should be able to pick up and faithfully reproduce sound from various distances where the sound sources might be. It should also have a wide Hi-Fi frequency response, and finally, it must also have good sensitivity.The sound capture coverage pattern of the microphone might need to be either omnidirectional or directional depending on how the sound sources are placed in the studio. At times, the required pattern might have to be the well-known Cardioid pattern, and so on so forth. However, under most circumstances, these studio microphones would need to be standalone and self-supporting. Therefore, they might be either placed on desktops or be suspended from boom-arms which themselves could be mechanically quite intricate.
There is one thing that is absolutely common under each of these circumstances. The studio must be noise-free and more importantly, it must be acoustically engineered to avoid producing any kind of undesired sound effects, reflections, reverberations, echos, etc.
What must be the attributes of a Radio Communication Microphone?
Barring the simple fact that the radio communication microphone must faithfully capture a human voice of a normal pitch and at the loudness level of regular speech, it doesn't ask for much more. Unlike the studio mic, it is not finicky about most of the other factors. For instance, as I mentioned before, a radio communication microphones need only an average dynamic range, relatively narrow frequency response coverage, and also a fairly moderate sensitivity.Radio communication microphones are typically always used to capture the voice of a single speaker (radio operator), and hence it is always held/mounted/placed in fairly close proximity to the speaker, within a few inches from his mouth. This brings up a few other special issues that are often experienced by radio operators... Let us examine and figure out what they are.
Breathing sound : When a microphone is held close to the mouth, the air exhaled from the nose on each breathing cycle would blow over the microphone and produce unpleasant background noise. Various innovative methods have been employed to mitigate this issue, one of which is to have a baffle plate on top of the microphone to act as a barrier to the exhaled gush of air.
Puffing sound : Puffs are another type of irritating noise that may be captured by a microphone during the speech. Puffs are produced by the gushing of air from the mouth during articulation of a variety of syllables. For instance, the sound of A, B, D would produce very little gust air pressure, while the sound of F, S, W, etc will tend to release short yet intense gusts of air when we speak. Check it out yourself. Place the palm of your hand in front of your mouth, close to your lips and speak something. You will feel the air gust on your palm several times as you speak. This is what we call the Puff.
When the microphone is held closely in front of the mouth, apart from the desired sound from the vocal chord, the air gusts (Puffs) also strike the microphone to produce very unpleasant and distracting puffing sounds on a continual basis... To mitigate this issue, various types of puff filters made from special fabric are often employed.
Head movement : If a microphone is placed at a fair distance from the speaker, then the normal head movement of the speaker like nodding, looking sideways, leaning forward or backward, etc as he might often do while expressing himself would not usually be an issue. The strength of the sound captured by the microphone will not vary substantially. However, when the mic is placed close to the speaker, then an alteration in mouth orientation or distance would magnify the variation in sound intensity that would be captured. Despite the ALC system of the radio transmitter, the variation in the microphone sound intensity as the radio operator tends to move even slightly while he does various rig control operations, and also continues to speak may lead to an undesired kind of signal strength modulation on his transmission. The results could be quite disconcerting at best... This problem needs to be fixed by somehow ensuring the relative position between his mouth and the microphone to remain constant.
Finally, one might ask, what is the optimum solution to circumvent the problems and attain great overall performance?
- Need not a large Dynamic Range because a single person's speech at normal loudness needs to be captured.
- The frequency Response need not be wide since a typical range from 250-3000 Hz need to be replicated.
- High degree of Sensitivity is not needed since the voice of only one person at relatively close quarters has to be captured.
- The Directivity pattern of the microphone coverage is not important because sound need not be captured from various locations in different directions.
- Immunity of acoustic noise pick up due to vibrations, air-flow, etc need not be factored in. A radio communication microphone does not have to discern and capture gentle and low-intensity sounds.
- Due to proximity to the speaker's mouth, the microphone should be able to mitigate the detrimental effects of nasal breathing and puffing from the mouth.
- The microphone should preferably be able to maintain a constant relative position w.r.t. the mouth of the speaker even if he were to move or turn his head during the course of speech delivery.
The above-listed facts could help us narrow down our options. Firstly, due to the requirement of only moderate sensitivity and not a very wide frequency response characteristics, a vital part of the microphone, the Diaphragm, which converts the sound pressure to equivalent and proportionate movement need not be very intricate and complex in design. In the first place, it need not be large since it neither has to respond to extremely low frequency (bass) sounds nor has it to respond to very low variations in sound pressure (high sensitivity not needed). Moreover, the material composition of the diaphragm, its thickness, and its structural-acoustic design to avoid undesired in-band resonances need not also be an issue in our case because our upper frequency (treble) response characteristics requirements are also rather limited.
Due to a small diaphragm size that suits our needs, the overall size of the microphone could also be pretty small. In fact, a small diameter Electret Microphone cartridge might be exactly what we need.
Almost all our above-listed criteria appear to be fulfilled, barring the nasal breathing sound, puffing, and the relative orientation issue. However, this has nothing to do with the microphone per se. It is more to do with its mounting and placement.
The solution to the last bit of the problem is rather simple. An elegant solution that takes care of all our microphone needs is actually available off the shelf. We come across it quite often in the form of a gaming mic-headset combo. Rather than opting for a cheap quality gaming headset, a radio operator may go for a professional quality mic-headset combo which could be more sturdy and comfortable with nice padded ear-cups.
The microphone in all these units is an electret mic that is mounted in a short length boom that extends from one of the earpieces. The boom is usually adjustable and can be made to swing around. The electret cartridge is typically placed at the bottom end of the boom. The length of the boom might vary but it is best to choose the one that extends till the lower side of a cheek and stays away from the lips at the side.
The idea of selecting a Headset Boom-Mic Combo unit is that it satisfies all our requirements for a great radio communication microphone. It accounts for all necessary electrical and acoustical parameters.
It does not pick up puffs or nasal exhaling sounds. The operator can freely move or turn his head to look around while speaking, it makes no difference. The microphone stays at a fixed relative position close to his cheek. Therefore, there is no variation in the sound level captured by the mic. Last but not the least, the microphone is always within a couple of inches to the operator's mouth. Therefore, the Headset Boom-mic combo is perfect for suppressing ambient noise to the maximum by enhancing the SNR. It also works wonderfully in suppressing the generation of reverberations even in a room with poor acoustic absorption characteristics.
OK, fair enough... Can I plugin a boom-mic headset combo that you suggested directly into my amateur radio rig? Most probably, NO... Aha!, so, do you mean to say that they are incompatible? The answer is again NO...
Typically, a commercial radio transceiver microphone and headphone interface would not be directly compatible with the mechanical interface plugs and sockets of the mic-headset combo. However, fabricating a simple crossover interface between them is usually very elementary. Another factor that might need to be looked into is the microphone's electrical signal amplitude and the source/load impedance mismatch between the rig and the mic. After going through the radio transceiver's manual and checking out the pin connection diagram, impedance, and recommended AF signal level for the mic and headset, any radio amateur worth his salt should be able to make a patching interface without much problem. Or else, take help from a more tech-savvy fellow amateur in your locality, or reach out to your local radio club for help in fabricating a suitable interface.
If one chooses not to go through any of the above hassles that might have provided the optimum solution, the least one can do is to opt for a compatible microphone from the original rig manufacturer, and make sure that it can be held in the hand and close to the mouth, rather than wastefully spending a fortune on a more fancy yet technically pointless studio mic.


(9 votes, Rating: 5.00) - Please vote the article with your valuable star rating. Thanks! Basu (VU2NSB)

SSN SSNf(10.7) – Real-time Solar Data


